Build your own Netflix with a HTPC
Because if you can wrangle docker, you can build your own Netflix.
If you didn’t know, I'm a big fan of all things piracy. After all, I did build nyumatflix.com back in 2021. One thing though is that through the years, I've seen this interesting timeline of movie rental services. Once it became democratized, it was only a matter of time before the big boys hopped on in.

It doesn't stop there tho. Capitalism had to go brrr. And it did. From Netflix making this tweet which was at the time a rare instance of a big player aligned with the interests of the people:
To then effectively eliminating password sharing:

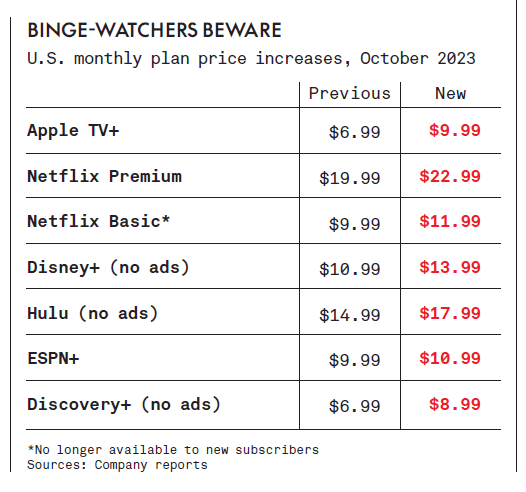
Once the enshittification commenced, restrictions tightened, it became more and more fragmented (with HBO Max, Disney+, and Hulu, et al. hoarding their exclusive content), and people around the world continued to shovel money into their pockets.
Just build your own....right? Well we're engineers, so yah.
For an upfront cost of a couple hundred bucks, and savings of $1440 over 5 years, you can set up your very own Home Theater PC (HTPC). At the core, it's a dedicated computer which can store and serve media, but instead of Netflix doing the hard parts, you get to do it yourself, end-to-end. And if ya know me, relying on profit driven corporations for this is a no-go.
I said piracy is back, but in reality, most people don't care! They don't want to worry about system adminstration, docker, or any of the fancy bells and whistles I'm about to talk about.
They only want to watch their favorite movies and shows. And tbh, I don't blame them. To me though, having my favorite TV shows and movies ready to watch with the desired quality and subtitles, all behind a VPN that I can access offline, on my phone, in a clean media player, is a no-brainer. But let me stop yapping about it and get to the lit stuff. ![]()
On this Page
The Stack
For this setup, I want something light and portable. Docker gives me exactly that with no plugin dependency hell, no heavy virtualization layer, and just clean docker-compose.yml files I can carry around and spin up anywhere. Everything stays reproducible and minimal, which is exactly what you want for your own HTPC box.
Could you do this with Proxmox or OpenMediaVault? Of course. But I think they shine in different scenarios. Proxmox is amazing if you need full-blown VMs with snapshots, GPU passthrough, or clustered high-availability. OpenMediaVault is great if your main priority is managing storage pools and NAS features with a nice web UI. For an HTPC though, both feel like overkill. The Docker approach is leaner and easier to keep up to date.
That said, I do run a full Debian VM under Proxmox for my Nextcloud server, since that app needs random packages and add-ons the official container doesn’t ship with. In that case, it makes life easier. But for Sonarr, Radarr, Jackett, Plex, etc., Docker images from linuxserver.io already cover 99% of use cases, so there’s no reason to complicate it.
Overview
Remember, this is how I do things. Use it as a reference, but be sure to adapt all of this as needed for your OS and your setup.
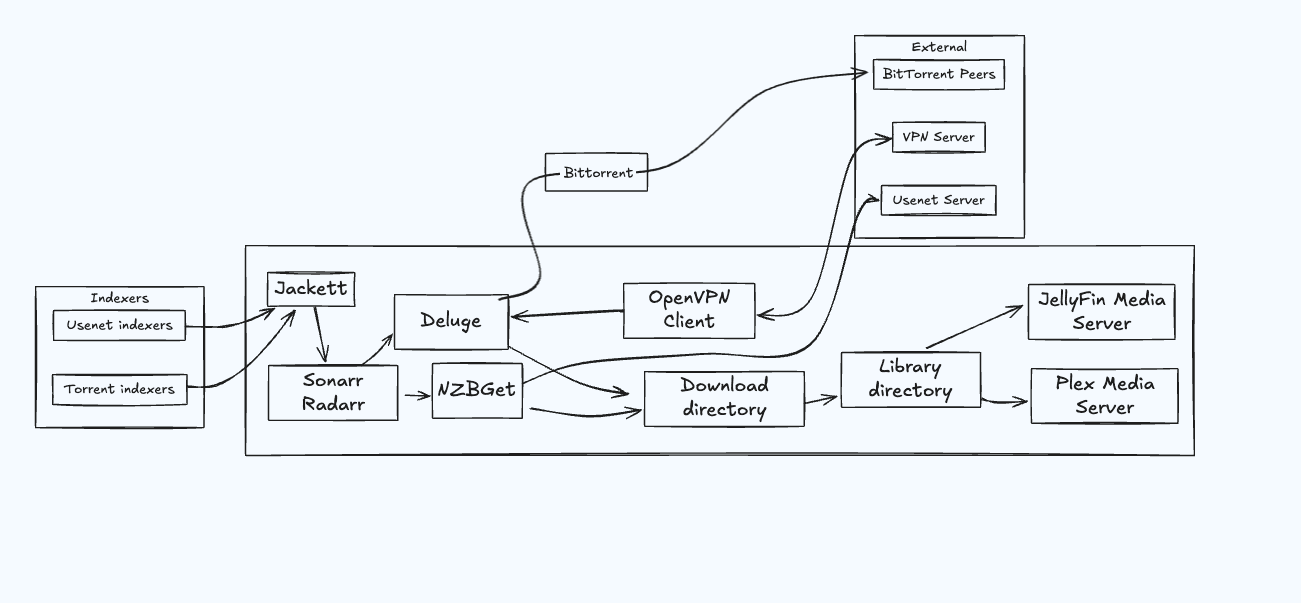
But anyway, here’s the gist of this whole stack. Several open-source tools run as Docker containers on a Linux box and hand off work to each other. The workflow I'm about to dive into shows how it all fits together.
Monitor movies + tv shows with Sonarr & Radarr
With Sonarr, I can search for a TV show by name and mark it as monitored. I specify the language and required quality and bitrate (like 4K 2160p). Then Sonarr automatically analyzes existing episodes and seasons, compares them with the release schedule, and fills in the gaps.

Sonarr can automatically upgrade your existing episodes when better quality versions become available (which we love) so I recommend setting your quality profiles to prioritize the formats you prefer. (I always prefer >1080p)
| Quality / Source | Approx File Size (2-hour movie) |
|---|---|
| 720p WebRip / Compressed | ~ 1-3 GB |
| 720p BluRay / WEB-DL | ~ 3-4 GB |
| 1080p WebRip / Compressed | ~ 5-8 GB |
| 1080p BluRay / WEB-DL | ~ 6-10 GB |
| 1080p Remux | ~ 20-30+ GB |
| 4K / 2160p (Compressed) | ~ 20-40+ GB |
| 4K / 2160p Remux | ~ 50-100+ GB |
Once downloaded, Sonarr moves the file to the appropriate location (my-tv-shows/show-name/season-1/01-title.mp4) and renames it if necessary. Radarr works similarly here, but it's designed for movies instead.
Search for releases automatically with Usenet & torrent indexers
Sonarr and Radarr can download files using two methods:
- Usenet (newsgroups) bin files: This is the traditional, reliable, and ISP friendly option, known for consistency, quality, and speed. It often requires a paid subscription. (I use NZBGet)
- Torrents: The more modern and popular option, which has seen significant improvements recently - but be careful, some ISPs block torrent traffic - use a VPN to avoid this.
I use both systems simultaneously, with torrents as a backup when Usenet doesn't have the release or the server is down. Eventually, I might switch to torrents only, as they work really well too.
Indexers
Sonarr/Radarr automatically search for files through a list of indexers that I configure. Indexers are APIs that allow searching for specific releases organized by categories. Think of it as browsing the Pirate Bay programmatically. This is common for newsgroups indexers using the Newznab API. However, this protocol doesn't exist for torrent indexers, so I use Jackett as a local proxy API for popular torrent indexers. It searches and parses information from various websites.

Don’t try that API key cause it’s already been revoked lmfao.
It's able to select the best release matching my criteria (e.g., non-blacklisted 1080p release with enough seeds) and pass it to the download through another set of tools depending on what you have configured. Also quick reminder, we're walking through this on a high-level first, so we'll get into the details later.
Handling bittorrent and usenet downloads with Deluge & NZBGet
Like I mentioned before, Sonarr and Radarr connect to downloaders for using both systems:
Both are daemons with a user-friendly Web UI, making them ideal for server installation. Sonarr & Radarr integrate with them, using their APIs to manage downloads, check statuses, and handle completed downloads. I use them for their integration with Sonarr/Radarr and as standalone downloaders for other needs - you can use them for anything you want.
For security and anonymity, I run Deluge behind a VPN. All traffic is encrypted and routed through an external VPN server, while other services remain on my local network. This is achieved through Docker's networking stack (more on this later).
Organize libraries and play videos with Plex or Jellyfin
Plex or Jellyfin, if you prefer organizes all my media into libraries. I set up one for TV shows and another for movies. The great thing about them is they automatically fetch metadata for each new release (description, actors, images, release date) and keep track of my progress.

Plex tracks watched status, new additions, and resume points across devices.
Plex’s cross device sync is incredibly OP: start on TV, continue on your phone or laptop.
Plex also offers clients on basically everything and can transcode when bandwidth or device decoding is limited.
Hardware Configuration
Now, let's get to the hardware. I'm going to drop my server, and while it's WAY overboard for this setup, any Raspberry Pi, old laptop, or basic NAS will work. Prioritize storage (>1TB) and network (1Gbps+) for the best experience.
I use a ProLiant MicroServer Gen10 Plus v2 Ultra with extra RAM, a small GPU for FHD decode, and an extra 2TB data drive. It runs Ubuntu 22.04 + Docker.
This stack works on Pi, Synology, Windows, or macOS with small Docker tweaks. But for my walkthrough I’ll focus on Linux.
Software Stack

Downloaders:
- Deluge: torrent downloader with web UI
- NZBGet: Usenet downloader with web UI
- Jackett: unified torrent indexer API
- Bazarr: automatic subtitles companion tool for Sonarr/Radarr
Download orchestration:
- Sonarr: manage TV shows, automatic downloads, sort & rename
- Radarr: similar to Sonarr, but for movies
VPN:
- OpenVPN client with privateinternetaccess.com
Media Center:
Installation Guide
Now, on to the fun part. ![]()
Prerequisites
Docker is essential for this setup. Make sure you have at least Docker version 20.10+ and Docker Compose v2 for the best compatibility.
Follow the official instructions to install Docker. Then add yourself to the docker group:
sudo usermod -aG docker myuser
Ensure it works:
docker run hello-world
Also install Docker Compose (see the official instructions).
Setup environment variables
Each image needs configuration. Instead of hardcoding values in docker-compose.yml, use a .env file. Example:
1# Your timezone, put yours if following along2TZ=America/Los_Angeles3PUID=10004PGID=10005# The directory where data and configuration will be stored.6ROOT=/media/your_user/storage/homemediaNotes:
TZuses the tz database.PUID/PGIDare fromid $USER.- Keep
.envbesidedocker-compose.yml.
(optional) Use premade docker-compose
This tutorial walks through creating your own compose file and configuring each app. Prefer a shortcut? Use this premade docker-compose (you'll need to copy it to your own setup).
- First, make a new directory for your media and configuration. This is where you'll run the full setup from (note: this isn't the same as your media directory, keep them separate).
- Use the
.env.examplebelow as a template for your.envfile. - Continue with this guide, and the
docker-composefile snippets you see are ready for you to use. You'll still need to manually configure your.envfile and other settings.
You can also use a premade Vagrant box, which will spin up an Ubuntu virtual machine and bootstrap the environment from the docker-compose file described above.
After ensuring Vagrant is installed on your machine:
- Run
vagrant upto bootstrap the vagrant box. - Run
vagrant sshto ssh into the box. - Use the default
192.168.7.7IP to access the box services from a local machine.
Here’s an example Vagrant file. Store your configs in a repo to simplify bootstrap:
1$script = <<-SCRIPT2apt-get update3apt-get install git docker docker-compose -y4systemctl enable docker && systemctl start docker5chown -R vagrant:vagrant /media6git clone https://github.com/your-username/your-repo.git7chown -R vagrant:vagrant your-repo8cd your-repo9cp .env.example .env10docker-compose up -d11SCRIPT12
13Vagrant.configure("2") do |config|14  config.vm.box = "ubuntu/jammy64"15  config.vm.provision "shell", inline: $script16  config.vm.network "private_network", ip: "192.168.7.7"17end
Introduction
We’ll run everything via Docker Compose using community images (shoutout to linuxserver.io).
Optional steps you might want to skip:
- VPN for Deluge traffic.
- Newsgroups (Usenet): skip NZBGet if you prefer torrents only.
Service Ports
Here are the default ports for each service:
| Service | Port | Purpose |
|---|---|---|
| Deluge | 8112 | Web UI |
| Jackett | 9117 | Web UI |
| NZBGet | 6789 | Web UI |
| Plex | 32400 | Web UI |
| Sonarr | 8989 | Web UI |
| Radarr | 7878 | Web UI |
| Bazarr | 6767 | Web UI |
Setup VPN Container
Using a VPN for torrenting is highly recommended to protect your privacy and avoid potential legal issues (Trust me, I've been there). Make sure your VPN provider supports P2P traffic.
The goal here is to have an OpenVPN Client container running and always connected. I'll make Deluge incoming and outgoing traffic go through this OpenVPN container.
There's a few things we need to ensure:
- VPN connection should be restarted if not responsive
- Traffic should be allowed through the VPN tunnel only, no leaky outgoing connection if the VPN is down
- Deluge Web UI should still be reachable from the local network
Lucky me, someone already set that up quite nicely.
Point 1 is resolved through the OpenVPN configuration (ping-restart set to 120 sec by default).
Point 2 is resolved through iptables rules
Point 3 is also resolved through iptables rules.
Configuration is explained on the project page. However it's not that easy depending on your VPN server settings. I'm using a privateinternetaccess.com (PIA) VPN, so here's how to set it up.
Setting up OpenVPN for PIA
This section only applies for PIA-driven accounts.
Download PIA OpenVPN configuration files.
In the archive, you'll find a bunch of <country>.ovpn files, along with 2 other important files: crl.rsa.2048.pem and ca.rsa.2048.crt. Pick the file associated to the country you'd like to connect to, for example sierra-leone.ovpn.
Copy the 3 files to ${ROOT}/config/vpn.
Create a 4th file vpn.auth with the following content:
1<pia username>2<pia password>You should now have 3 files in ${ROOT}/config/vpn:
- sierra-leone.ovpn
- vpn.auth
- crl.rsa.2048.pem
- ca.rsa.2048.crt
Edit sierra-leone.ovpn (or any other country of your choice) to tweak a few things (see my comments):
1client2dev tun3proto udp4remote nl.privateinternetaccess.com 11985resolv-retry infinite6nobind7persist-key8# persist-tun # disable to completely reset vpn connection on failure9cipher aes-128-cbc10auth sha111tls-client12remote-cert-tls server13auth-user-pass /vpn/vpn.auth # to be reachable inside the container14comp-lzo15verb 116reneg-sec 017crl-verify /vpn/crl.rsa.2048.pem # to be reachable inside the container18ca /vpn/ca.rsa.2048.crt # to be reachable inside the container19disable-occ20keepalive 10 30 # send a ping every 10 sec and reconnect after 30 sec of unsuccessfull pings21pull-filter ignore "auth-token" # fix PIA reconnection auth error that may occur every 8 hoursThen, rename <country>.ovpn to vpn.conf
Docker container
Add it to compose and make Deluge use the VPN container network:
1vpn:2 container_name: vpn3 image: dperson/openvpn-client:latest4 cap_add:5 - net_admin # required to modify network interfaces6 restart: unless-stopped7 volumes:8 - /dev/net:/dev/net:z # tun device9 - ${ROOT}/config/vpn:/vpn # OpenVPN configuration10 security_opt:11 - label:disable12 ports:13 - 8112:8112 # port for deluge web UI to be reachable from local network14 command: "-r 192.168.1.0/24" # route local network trafficVerify Deluge egresses via VPN using torguard check: add the provided magnet, wait, then confirm the displayed IP matches your VPN.

Always verify your VPN is working by checking your IP address before and after connecting. Tools like torguard.net/checkmytorrentipaddress.php are perfect for this.
Setup Deluge
Docker container
Use the linuxserver Deluge image, which bundles daemon and web UI:
1deluge:2 container_name: deluge3 image: linuxserver/deluge:latest4 restart: unless-stopped5 network_mode: service:vpn # run on the vpn network6 environment:7 - PUID=${PUID} # default user id, defined in .env8 - PGID=${PGID} # default group id, defined in .env9 - TZ=${TZ} # timezone, defined in .env10 volumes:11 - ${ROOT}/downloads:/downloads # downloads folder12 - ${ROOT}/config/deluge:/config # config filesNotice how deluge is now using the vpn container network, with deluge web UI port exposed on the vpn container for local network access.
Run with docker-compose up -d. Follow logs with docker-compose logs -f deluge.
Configuration
Login to the web UI at localhost:8112 (or your host IP).

Default password is deluge. Change it. Only consider disabling auth if Deluge is isolated to your LAN and you trust your network.
Only disable authentication if you're certain your Deluge instance is not accessible from outside your local network. For external access, always use strong passwords.
The running deluge daemon should be automatically detected and appear as online. You can connect to it.

Configure separate folders for incomplete and complete downloads. Add a blackhole directory to auto‑ingest .torrent files from Jackett manual searches.
Enable the autoadd plugin to support .magnet files.

Make sure you tweak the queue settings (their defaults are small) and optionally stop seeding after a ratio so Sonarr can remove completed torrents, just keep ratios reasonable.
Configuration gets stored automatically in my mounted volume (${ROOT}/config/deluge) to be re-used at container restart. Important files in there:
authcontains my login/passwordcore.confcontains my deluge configuration
You can also use the web UI for manual .torrent or magnet downloads.
Setup Jackett
Jackett translates Sonarr/Radarr requests into searches across popular torrent sites that lack a standard API (it HTML-parses many of them). Think of it like a thin proxy API for popular torrent indexers.
Docker container
Use the linuxserver.io container:
1jackett:2 container_name: jackett3 image: linuxserver/jackett:latest4 restart: unless-stopped5 network_mode: host6 environment:7 - PUID=${PUID} # default user id, defined in .env8 - PGID=${PGID} # default group id, defined in .env9 - TZ=${TZ} # timezone, defined in .env10 volumes:11 - /etc/localtime:/etc/localtime:ro12 - ${ROOT}/downloads/torrent-blackhole:/downloads # place where to put .torrent files for manual download13 - ${ROOT}/config/jackett:/config # config filesThis mirrors other linuxserver images. The key setting is the torrent blackhole directory: Jackett saves .torrent files there for Deluge to pick up.
Start with:
1docker-compose up -dConfiguration and usage
Jackett web UI is available on port 9117.

Configuration is available at the bottom of the page. I chose to disable auto-update (relying on docker image tags), and to set /downloads as the blackhole directory.
You can click on Add Indexer and add any torrent indexer that you like. I added 1337x, cpasbien, RARBG, The Pirate Bay and YGGTorrent (need a user/password).
You can now perform a manual search across multiple torrent indexers in a clean interface with no trillion ads pop-up everywhere. Then choose to save the .torrent file to the configured blackhole directory, ready to be picked up by Deluge automatically!

Setup NZBGet
Docker container
Use the linuxserver NZBGet image in Compose:
1nzbget:2 container_name: nzbget3 image: linuxserver/nzbget:latest4 restart: unless-stopped5 network_mode: host6 environment:7 - PUID=${PUID} # default user id, defined in .env8 - PGID=${PGID} # default group id, defined in .env9 - TZ=${TZ} # timezone, defined in .env10 volumes:11 - ${ROOT}/downloads:/downloads # download folder12 - ${ROOT}/config/nzbget:/config # config filesConfiguration and usage
After starting, the web UI is on localhost:6789.
Username: nzbget
Password: tegbzn6789

Since NZBGet stays on my LAN, I disable the password (Settings → Security → ControlPassword). Only do this if your setup is secure.
Configure your newsgroup server URL and credentials (Settings → News‑servers). I use Frugal Usenet with TLS.
Defaults are fine; review Paths to match your layout.
You can add .nzb files manually, but the goal is automation via Sonarr/Radarr.
Usenet requires a paid subscription to a newsgroup provider. Popular options include Newshosting, UsenetServer, and Frugal Usenet. Expect to pay $5-15/month for good service.
Setup Plex
Media Server Docker Container
Plex provides a maintained Docker image. Use host networking and mount config, transcode, and media:
1plex-server:2 container_name: plex-server3 image: plexinc/pms-docker:latest4 restart: unless-stopped5 environment:6 - TZ=${TZ} # timezone, defined in .env7 network_mode: host8 volumes:9 - ${ROOT}/config/plex/db:/config # plex database10 - ${ROOT}/config/plex/transcode:/transcode # temp transcoded files11 - ${ROOT}/complete:/data # media libraryStart it with docker-compose up -d.
Configuration
Plex Web UI: localhost:32400/web (or your server IP).
Note: If you're running on a headless server (e.g. Synology NAS) with container using host networking, you will need to use ssh tunneling to gain access and setup the server for first run. (see https://forums.plex.tv/t/i-did-something-stupid-please-plex-forums-your-my-only-hope/328481/11)
You'll have to login first (registration is free), then Plex will ask you to add your libraries. I have two libraries:
- Movies
- TV shows
Make these the library paths:
- Movies:
/data/movies - TV:
/data/tv
As you'll see later, these library directories will each have files automatically placed into them with Radarr (movies) and Sonarr (tv), respectively.
Now, Plex will then scan your files and gather extra content; it may take some time according to how large your directory is.
A few things I like to configure in the settings:
- Set time format to 24 hours (never understood why some people like 12 hours)
- Tick "Update my library automatically"
You can already watch your stuff through the Web UI. Note that it's also available from an authenticated public URL proxied by Plex servers (see Settings/Server/Remote Access). You may note the URL or choose to disable public forwarding.
Setup Plex clients
Plex clients are available for most devices: phones, TVs, consoles, and desktop. Just install, sign in, enter the validation code, and you’re set.
On a Linux Desktop, there are several alternatives. Historically, Plex Home Theater, based on XBMC/Kodi was the principal media player, and by far the client with the most features. It's quite comparable to XBMC/Kodi, but fully integrates with Plex ecosystem. Meaning it remembers what you're currently watching so that you can pause your movie in the bedroom while you continue watching it in the toilets \o/. Recently, Plex moved to a rewritten player called Plex Media Player. It’s not officially on Linux yet but can be built from source or run via a community AppImage. Shiny UI, a few missing features (e.g., subtitle offset editing).

If that doesn’t suit you, try the official Kodi add‑on for Plex.
Also the old good Plex Home Theater is still available, in an open source version called OpenPHT.
Personal choice: after OpenPHT I’m trying Plex Media Player. Pick what fits your setup.
Setup Sonarr
Docker container
We’ll use the linuxserver Sonarr image:
1sonarr:2 container_name: sonarr3 image: linuxserver/sonarr:latest4 restart: unless-stopped5 network_mode: host6 environment:7 - PUID=${PUID} # default user id, defined in .env8 - PGID=${PGID} # default group id, defined in .env9 - TZ=${TZ} # timezone, defined in .env10 volumes:11 - /etc/localtime:/etc/localtime:ro12 - ${ROOT}/config/sonarr:/config # config files13 - ${ROOT}/complete/tv:/tv # tv shows folder14 - ${ROOT}/downloads:/downloads # download folderStart with:
1docker-compose up -dSonarr listens on port 8989. Mount your TV library (final destination) and downloads (for completed import).
Configuration
Sonarr should be available on localhost:8989. Go straight to the Settings tab.

Enable Ignore Deleted Episodes to avoid re‑downloads after deletion. In Media Management, optionally enable automatic renaming. In Profiles, adjust quality; set Usenet vs Torrent priority (I keep Usenet first).
Indexers is the important tab: that's where Sonarr will grab information about released episodes. Nowadays a lot of Usenet indexers are relying on Newznab protocol: fill-in the URL and API key you're using. You can find some indexers on this subreddit wiki. It's nice to use several ones since they are quite volatile. You can find suggestions on Sonarr Newznab presets. Some of these indexers provide free accounts with a limited number of API calls, you'll have to pay to get more. Usenet-crawler is one of the best free indexers out there.
For torrent indexers, add Torznab custom indexers pointing to Jackett. Configure them one by one.
Get Torznab URLs from Jackett via Copy Torznab Feed and use the global API key.

Download Clients tab is where you'll configure links with your two download clients: NZBGet and Deluge.
There are existing presets for these 2 that you'll fill with the proper configuration.
NZBGet configuration:

Deluge configuration:

Enable Advanced Settings and tick Remove in Completed Download Handling so Sonarr can remove torrents from Deluge once processed.
In Connect tab, you'll configure Sonarr to send notifications to Plex when a new episode is ready:

Give it a try
Let's add a series!

You may need to chown -R $USER:$USER /path/to/root/directory so Sonarr and the rest of the apps have the proper permissions to modify and move around files. This Docker image of Sonarr uses an internal user account inside the container called abc so you may have to set this user as owner of the directory where it will place the media files after download. This also applies for Radarr.
You enter the series name, then you can choose a few things:
- Monitor: what episodes do you want to mark as monitored? All future episodes, all episodes from all seasons, only latest seasons, nothing? Monitored episodes are the episodes Sonarr will download automatically.
- Profile: quality profile of the episodes you want (HD-1080p is the most popular I guess).
You can then either add the serie to the library (monitored episode research will start asynchronously), or add and force the search.

Wait a few seconds, then you should see that Sonarr started doing its job. Here it grabbed files from my Usenet indexers and sent the download to NZBGet automatically.

You can run manual or automatic searches per episode.
When download is over, you can head over to Plex and see that the episode appeared correctly, with all metadata and subtitles grabbed automatically. Wohoo!

Setup Radarr
Radarr is Sonarr’s movie‑focused sibling. It replaces CouchPotato with a similar, more reliable workflow.
Docker container
Radarr is very similar to Sonarr:
1radarr:2 container_name: radarr3 image: linuxserver/radarr:latest4 restart: unless-stopped5 network_mode: host6 environment:7 - PUID=${PUID} # default user id, defined in .env8 - PGID=${PGID} # default group id, defined in .env9 - TZ=${TZ} # timezone, defined in .env10 volumes:11 - /etc/localtime:/etc/localtime:ro12 - ${ROOT}/config/radarr:/config # config files13 - ${ROOT}/complete/movies:/movies # movies folder14 - ${ROOT}/downloads:/downloads # download folderConfiguration
Radarr Web UI is available on port 7878.
Go straight to the Settings section.
In Media Management, optionally enable automatic renaming. With Bazarr handling subtitles, original filenames aren’t required. Enable Ignore Deleted Movies to prevent re‑downloads. I disable Use Hardlinks instead of Copy to keep downloads and library cleanly separated.
In Profiles, adjust quality and choose Usenet vs Torrent priority (I keep Usenet first).
Configure Indexers similarly to Sonarr: add Newznab Usenet indexers (URL + API key; see the wiki) and Torznab indexers from Jackett (Copy Torznab Feed, use global API key).
In Download Clients, configure NZBGet and Deluge using the same settings as Sonarr.
Enable Advanced Settings and tick Remove in Completed Download Handling so Radarr can remove torrents from Deluge once processed.
In Connect tab, you'll configure Radarr to send notifications to Plex when a new movie is ready:
Give it a try
Let's add a movie!

Enter the movie name, choose the quality you want, and there you go.
You can then either add the movie to the library (monitored movie research will start asynchronously), or add and force the search.
Wait a few seconds, then you should see that Radarr started doing its job. Here it grabbed files from my Usenet indexers and sent the download to NZBGet automatically.
You can also do a manual search for each movie, or trigger an automatic search.
When download is over, you can head over to Plex and see that the movie appeared correctly, with all metadata and subtitles grabbed automatically. Let's goooo!

Movie discovering
I like the discovering feature. When clicking on Add Movies you can select Discover New Movies, then browse through a list of TheMovieDB recommended or popular movies.

On the rightmost tab, you'll also see that you can setup Lists of movies. What if you could have in there a list of the 250 greatest movies of all time and just one-click download the ones you want?
This can be set up in Settings/Lists. I activated the following lists:
- StevenLu: that's an interesting project that tries to determine by certain heuristics the current popular movies.
- IMDB TOP 250 movies of all times from Radarr Lists presets
- Trakt Lists Trending and Popular movies
I disabled automatic sync for these lists: I want them to show when I add a new movie, but I don't want every item of these lists to be automatically synced with my movie library.
Setup Bazarr
Back in the day, we used the sub-zero plugin for plex. Based on someone's suggestion on this project I tried out Bazarr which hooks directly into Radarr and Sonarr and makes the process more effective and painless. If we don't care about subtitles go ahead and skip this step.
Bazarr Docker container
Believe it or not, I will be using yet another docker container from linuxserver! Since this is made to be a companion app for Sonarr and Radarr, you will notice that the configuration is very similar to them, just point it at the directories where you store your organized movies and tv shows.
1bazarr:2 container_name: bazarr3 image: linuxserver/bazarr4 restart: unless-stopped5 network_mode: host6 environment:7 - PUID=${PUID} # default user id, defined in .env8 - PGID=${PGID} # default group id, defined in .env9 - TZ=${TZ} # timezone, defined in .env10 - UMASK_SET=022 #optional11 volumes:12 - ${ROOT}/config/bazarr:/config # config files13 - ${ROOT}/complete/movies:/movies # movies folder14 - ${ROOT}/complete/tv:/tv # tv shows folderBazarr Configuration
The Web UI for Bazarr will be available on port 6767. Load it up and you will be greeted with this setup page:

You can leave this page blank and go straight to the next page, "Subtitles". There are many options for different subtitle providers to use, but in this guide I'll be using Open Subtitles. If you don't have an account with them, head on over to the Registration page and make a new account. Then all you need to do is tick the box for OpenSubtitles and fill in your new account details.

You can always add more subtitle providers if you want, figure out which ones are good for you!
Next you scroll to the bottom of the screen where you will find your language settings. I'm interested in French as well as English subtitles so I will add both of them for enabled languages. However I'm primarily interested in French so I will turn on "Default Enabled" for both TV and movies and finally set French to be that default.

I click next and I will be on the Sonarr setup page. For this part I will need my Sonarr API key. To get this, I open up sonarr in a separate tab and navigate to Settings > General > Security and copy the api key listed there.

I head back over Bazarr and check the "Use Sonarr" box and some settings will pop up. I paste my API key in the proper field, and I can leave the other options default. If I would like, I can tick the box for "Download Only Monitored" which will prevent Bazarr from downloading subtitles for tv shows I have in my Sonarr library but have possibly deleted from my drive. Then I click "Test" and Sonarr should be all set!

The next step is connecting to Radarr and the process should be identical. The only difference is that you'll have to grab your Radarr API key instead of Sonarr. Once that's done you click Finish and you will be brought to your main screen where you will be greeted with a message saying that you need to restart. You click this and Bazarr should reload. Once that's all set, you should be good to go! Bazarr should now automatically download subtitles for the content you add through Radarr and Sonarr that is not already found within the media files themselves.
If you have any problems, check out the wiki page for Bazarr. There should be an answer there.
Manage it all from your phone
On iOS, I'm using nzb360 to manage NZBGet, Deluge, Sonarr and Radarr. It’s a well‑designed app with great upcoming‑release views (e.g., “when’s the next Summer I Turned Pretty episode?”). Worth a look.

Going Further
Some stuff worth looking at that I don't use at the moment (but you might want to explore):
- NZBHydra: meta search for NZB indexers (like Jackett does for torrents). Could simplify and centralise nzb indexers configuration at a single place.
- Organizr: Embed all these services in a single webpage with tab-based navigation
- Plex sharing features
- Headphones: Automated music download. Like Sonarr but for music albums. I've been using it for a while, but it did not give me satisfying results. I also tend to rely entirely on a Spotify premium account to manage my music collection now.
- Mylar: like Sonarr, but for comic books.
- Ombi: Web UI to give your shared Plex instance users the ability to request new content
- PlexPy: Monitoring interface for Plex. Useful if you share your Plex server to multiple users.
- Radarr lists automated downloads, to fetch best movies automatically. Rotten Tomatoes certified movies would be a nice list to parse and get automatically.